Posted on Leave a comment

Connecting a 7-Segment display to an Arduino

Certainly! Here’s a revised version of the tutorial that includes code for looping through multiple digits on a seven-segment LED display:

Materials Required

  • Arduino Uno
  • Breadboard
  • Seven-segment LED display (common cathode or common anode)
  • Jumper wires
  • USB cable (Type A to Type B)
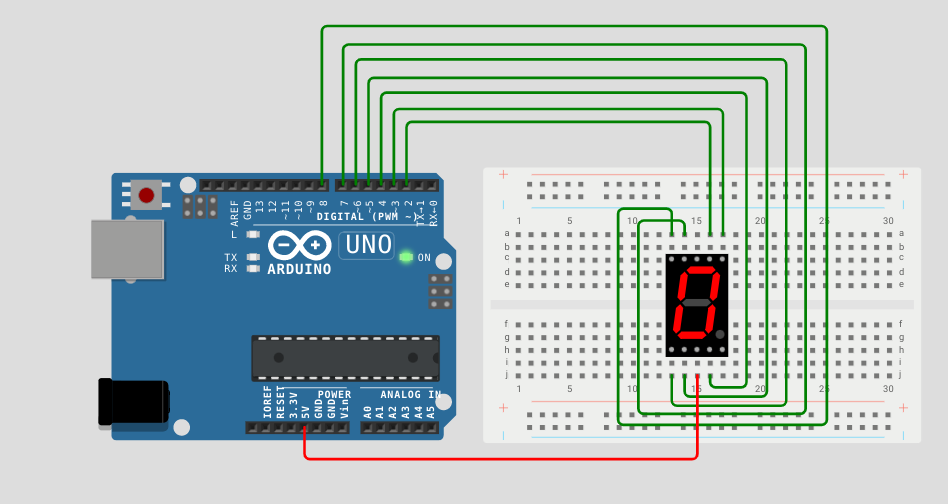
Wiring the Circuit

Step 1: Place the Arduino Uno on the breadboard.

  • Position the Arduino Uno on the breadboard, aligning the USB port side with the longer section of the breadboard.

Step 2: Connect power and ground.

  • Connect the 5V pin of the Arduino to the positive rail (+) on the breadboard.
  • Connect the GND pin of the Arduino to the ground rail (-) on the breadboard.

Step 3: Connect the segment pins of the seven-segment LED display.

  • Identify the segment pins on your seven-segment LED display. The common cathode display will have a common cathode pin, while the common anode display will have a common anode pin.
  • Connect the segment pins of the seven-segment LED display to the Arduino Uno using jumper wires. Ensure that the pin connections match those specified in the code examples I provided earlier. For example, connect segment pin “a” to Arduino pin 2, segment pin “b” to Arduino pin 3, and so on.

Step 4: Connect the common pin of the seven-segment LED display.

  • For a common cathode display, connect the common cathode pin to the ground rail (-) on the breadboard.
  • For a common anode display, connect the common anode pin to the positive rail (+) on the breadboard.

Step 5: Load the code onto the Arduino Uno.

  • Open the Arduino Integrated Development Environment (IDE) on your computer. If you don’t have it installed, you can download it from the official Arduino website (https://www.arduino.cc/en/software).
  • Connect the Arduino Uno to your computer using the USB cable.
  • In the Arduino IDE, select the appropriate board by navigating to “Tools” > “Board” > “Arduino Uno”.
  • Select the appropriate port by navigating to “Tools” > “Port” and selecting the port that corresponds to your Arduino Uno.
  • Copy and paste the following code into the Arduino IDE:


// Pin Definitions
const int segmentPins[] = {2, 3, 4, 5, 6, 7, 8}; // Pins connected to segments a, b, c, d, e, f, g
const int digitPins[] = {9, 10, 11, 12}; // Pins connected to digit 1, 2, 3, 4

// Digit patterns for numbers 0 to 9
const byte digitPatterns[] = {
B11111100, // 0
B01100000, // 1
B11011010, // 2
B11110010, // 3
B01100110, // 4
B10110110, // 5
B10111110, // 6
B11100000, // 7
B11111110, // 8
B11110110 // 9
};

void setup() {
// Set segment and digit pins as outputs
for (int i = 0; i < 7; i++) {
pinMode(segmentPins[i], OUTPUT);
}

for (int i = 0; i < 4; i++) {
pinMode(digitPins[i], OUTPUT
\void loop() {
  int number = 1234; // Number to display

  displayNumber(number); // Display the number
  delay(1000);           // Wait for 1 second
}

void displayNumber(int number) {
  // Extract individual digits from the number
  int digits[4];
  digits[0] = number / 1000;
  digits[1] = (number / 100) % 10;
  digits[2] = (number / 10) % 10;
  digits[3] = number % 10;

  // Loop through each digit
  for (int i = 0; i < 4; i++) {
    // Set the current digit pin high
    digitalWrite(digitPins[i], HIGH);

    // Display the digit pattern on the segments
    for (int j = 0; j < 7; j++) {
      digitalWrite(segmentPins[j], bitRead(digitPatterns[digits[i]], j));
    }

    // Delay to hold the digit for a short period
    delay(5);

    // Set the current digit pin low to turn it off
    digitalWrite(digitPins[i], LOW);
  }
}
);

In this code, the loop() function continuously repeats the process of displaying the number on the seven-segment LED display and then waiting for 1 second before displaying the next number.

The displayNumber() function takes the number as input and extracts individual digits from it. It then iterates through each digit, sets the corresponding digit pin high to select it, and displays the digit pattern on the segments of the seven-segment LED display. After a short delay, the digit pin is set low to turn it off.

To customize the displayed number, modify the number variable in the loop() function.

After completing these steps, verify the wiring connections and click on the “Upload” button (right arrow icon) in the Arduino IDE to compile and upload the code to the Arduino Uno. The Arduino Uno will then run the code and display the desired numbers on the seven-segment LED display.

Remember to adjust the pin numbers in the code if you have connected the segments or digit pins to different Arduino pins.

That’s it! You have successfully wired an Arduino Uno with a seven-segment LED display using a breadboard and loaded the code to display multiple digits.

Posted on Leave a comment

Let’s Make a Raspberry Pi Display Digits on a Single 7-Segment LED with Python!

Introduction

Hey there! So, you’ve got yourself a Raspberry Pi, huh? That’s awesome! In this tutorial, we’re going to have some fun and learn how to make that Raspberry Pi of yours display some cool digits on a nifty 7-segment LED. It’s going to be a great adventure in programming and tinkering with hardware, so let’s dive right in!

Step 1: Wiring the Raspberry Pi and 7-Segment LED Display

Okay, before we start making things light up, we need to do some wiring. Don’t worry, it’s easier than it sounds! Grab your Raspberry Pi, the 7-segment LED display, a breadboard, and some jumper wires. Here’s what you need to do:

  1. Connect the common cathode (or common anode) pin of the 7-segment display to a GND pin on your Raspberry Pi. This helps create a common reference for the LED segments.
  2. Take a deep breath and connect each segment pin of the display to individual GPIO pins on the Raspberry Pi. And hey, don’t forget to use resistors (around 220-470 Ohms) to keep things safe and sound.

Step 2: Setting up the Raspberry Pi

Now that our hardware is all set, let’s make sure our Raspberry Pi is ready to rock and roll. Make sure your Pi is powered on and connected to a monitor, keyboard, and mouse. Ready? Alright, here’s what you need to do:

  1. If you prefer using the Raspberry Pi’s built-in Python editor, you can access it by clicking on the Raspberry Pi icon in the top-left corner, navigating to Programming, and selecting “Thonny Python IDE.” This editor provides a user-friendly interface for writing and running Python code directly on the Pi.
  2. Alternatively, if you prefer using a common text editor on another computer, you can connect to your Raspberry Pi via SSH. Open a terminal on your computer and type ssh pi@<your_pi's_IP_address> (replace <your_pi's_IP_address> with the IP address of your Raspberry Pi). Enter the Pi’s password when prompted, and voila! You can now remotely edit and run Python code on your Pi using your favorite text editor.

Step 3: Writing and Running the Python Code

Here comes the fun part: writing the Python code to control our 7-segment LED display. Ready to get coding? Let’s do this!

  1. Open your preferred Python editor, either the built-in editor on the Raspberry Pi or a text editor on another computer connected via SSH.
  2. Create a new Python script. Let’s call it display_digits.py for simplicity.
  3. Import the necessary libraries at the top of your script. Add the following lines:
import RPi.GPIO as GPIO
import time
  1. Define the GPIO pins we’ll use for our LED segments. Add the following line:
# Define the segment pins
segments = (11, 12, 13, 15, 16, 18, 22, 7)
  1. Set up the GPIO mode and create a function that will display a digit on our 7-segment display. Use the following code snippet:
# Set up GPIO mode
GPIO.setmode(GPIO.BOARD)

# Set up GPIO pins as output
GPIO.setup(segments, GPIO.OUT)

# Define digit patterns for 0-9
digits

 = {
    0: (1, 1, 1, 1, 1, 1, 0),
    1: (0, 1, 1, 0, 0, 0, 0),
    2: (1, 1, 0, 1, 1, 0, 1),
    3: (1, 1, 1, 1, 0, 0, 1),
    # Keep adding patterns for other digits...
}
  1. Write a function that will display a specific digit on our LED display. Here’s an example:
def display_digit(digit):
    for i in range(7):
        GPIO.output(segments[i], digits[digit][i])
  1. Save the Python script. To run the program, open a terminal on the Raspberry Pi (if you’re using the built-in editor) or on your computer (if you’re using SSH). Navigate to the directory where you saved the display_digits.py script, and type the following command:
python display_digits.py

This will execute the Python script, and you should see the digits being displayed on the 7-segment LED.

Conclusion

Congratulations! You’ve successfully learned how to wire up a 7-segment LED display to your Raspberry Pi, write Python code to control it, and run the program. Isn’t that amazing? Now you can display all sorts of digits and create your own digital masterpieces. Keep exploring and experimenting with your Raspberry Pi. The possibilities are endless!

Happy coding!

Posted on Leave a comment

Step-by-step guide on how to install the Heroku CLI:

NOTE: It could not be any easier.

Check for prerequisites:

Before you can install the Heroku CLI, you need to ensure that you have Git installed. If you haven’t installed Git yet, you can download it from here. Additionally, verify that you have the following software on your machine:

macOS: You should have the Homebrew package manager installed.

Windows: You should have the Chocolatey package manager installed.

Linux/Ubuntu: You don’t need a specific package manager, but you should have access to a terminal.

Installation:

macOS:

Open the terminal and run the following command:

brew install heroku/brew/heroku

Windows:

Open the PowerShell as an administrator and run the following command:

 choco install heroku-cli

Linux/Ubuntu:

Open the terminal and run the following script:

 curl https://cli-assets.heroku.com/install.sh | sh

Login to Heroku:

Verifying your installation:

After you’ve installed the Heroku CLI, you need to log in to your Heroku account. You can do this by running the following command:

heroku login

This will open a new browser window where you’ll be prompted to enter your Heroku credentials. After you’ve successfully logged in, you can close the browser window and return to the terminal or PowerShell.

You’ve now installed the Heroku CLI and are ready to start using Heroku from your terminal! If you encounter any issues during the installation, you should refer to the official Heroku CLI documentation.

Posted on Leave a comment

Tutorial: Using Bitwise Operators for File Permission Manipulation

Bitwise Operators in Python

Step 1: Understanding the Permission System

In a typical file system, each file has associated permissions that determine which actions can be performed on it. These permissions are usually represented using a set of three characters: read (r), write (w), and execute (x). Each character can be either present or absent, indicating whether the permission is granted or not.

Step 2: Assigning Numeric Values to Permissions

To make the manipulation of permissions easier, we can assign numeric values to each permission. Let’s assign the value 4 to read (r), 2 to write (w), and 1 to execute (x).

READ = 4
WRITE = 2
EXECUTE = 1

Step 3: Representing Permissions as Bits

To efficiently store and manipulate permissions, we can represent them using bits. We’ll use a 3-bit sequence where each bit corresponds to one permission. A set bit (1) represents the presence of a permission, and an unset bit (0) represents its absence.

user_permissions = 0b000
group_permissions = 0b000
other_permissions = 0b000

Step 4: Combining Permissions Using Bitwise OR

To grant multiple permissions to a user or group, we can use the bitwise OR operator (|) to combine the corresponding bits. For example, to grant read and execute permissions, we perform a bitwise OR operation between their numeric values: 4 | 1 = 5.

user_permissions |= READ | EXECUTE
group_permissions |= READ | EXECUTE

Step 5: Checking Permissions Using Bitwise AND

To check if a user or group has a specific permission, we can use the bitwise AND operator (&). By performing a bitwise AND operation between the permission value and the corresponding bit sequence, we can determine if the permission is present or absent. For example: to check if a user has write permission (2), we perform the operation: permissions

def has_write_permission(permissions):
    return bool(permissions & WRITE)

user_has_write_permission = has_write_permission(user_permissions)

Step 6: Example Usage

Let’s say we have a file with the following permissions:

  • User: read and write
  • Group: read and execute
  • Others: no permissions

We can represent these permissions using the numeric values: User = 6, Group = 5, Others = 0.

user_permissions = READ | WRITE
group_permissions = READ | EXECUTE
other_permissions = 0

To grant read and write permissions to the user, we perform a bitwise OR operation:

user_permissions |= READ | WRITE

To check if the group has execute permission, we perform a bitwise AND operation:

def has_execute_permission(permissions):
    return bool(permissions & EXECUTE)

group_has_execute_permission = has_execute_permission(group_permissions)

Understanding More:

Let’s explain why each bitwise OR and AND operation gives the effective permission in the context of file permissions.

Bitwise OR (|) operation:
The bitwise OR operation combines the bits of two values, setting any bit that is set in either value. In the case of file permissions, when we perform a bitwise OR operation between two permission values, it results in the effective permission that includes the combined set of permissions.

For example, let’s consider the following scenario:

  • User permission: read (represented by 4) and write (represented by 2)
  • Group permission: read (represented by 4) and execute (represented by 1)

When we perform a bitwise OR operation between the user and group permissions, it combines the respective bits:

User Permission:    6 (0b110)     # 4 (0b100) | 2 (0b010)
Group Permission:   5 (0b101)     # 4 (0b100) | 1 (0b001)

The resulting effective permission becomes:

Effective Permission: 7 (0b111)    # 6 (0b110) | 5 (0b101)

The effective permission 7 (0b111) indicates that the file has read, write, and execute permissions for the user and group.

Bitwise AND (&) operation:
The bitwise AND operation compares the bits of two values and sets the result to 1 only if both corresponding bits are set to 1. In the case of file permissions, when we perform a bitwise AND operation between a permission value and a specific bit pattern, it helps determine whether a particular permission is present or absent.

For example, let’s consider the following scenario:

  • User permission: read and write (represented by the value 6)

To check if the user has write permission, we perform a bitwise AND operation between the user permission and the write bit pattern (represented by the value 2):

User Permission:     6 (0b110)    # read (4) | write (2)
Write Bit Pattern:   2 (0b010)    # write (2)

The bitwise AND operation is as follows:

Result:              2 (0b010)    # 6 (0b110) & 2 (0b010)

The resulting value 2 (0b010) indicates that the user has write permission.

By using the bitwise OR and AND operations appropriately, we can combine and check permissions efficiently in a file system, making it easier to manage and control access rights for users, groups, and other entities.

Conclusion

By representing permissions as bits and using bitwise operators, we can efficiently manipulate and check file permissions. This approach allows for compact storage and quick permission checks, making it suitable for real-world applications like file systems, where efficient permission management is essential.

Note: The example provided is a simplified demonstration for educational purposes. In practice, file permissions are usually represented using more complex schemes and involve additional considerations.

Posted on Leave a comment

Getting Started: Installing Node-RED on Raspberry Pi

Introduction: Node-RED is a popular flow-based programming tool that allows users to create powerful and interactive applications by wiring together different nodes. Raspberry Pi, with its GPIO pins and Linux-based operating system, provides an excellent platform for running Node-RED. In this article, we will guide you through the process of installing Node-RED on your Raspberry Pi, enabling you to unleash the full potential of this versatile tool.

Step 1: Preparing your Raspberry Pi:

  1. Connect your Raspberry Pi to a monitor, keyboard, and mouse.
  2. Ensure that your Raspberry Pi is connected to the internet.

Step 2: Updating the System:

  1. Open a terminal window on your Raspberry Pi.
  2. Update the package lists by running the following command:
sudo apt update
  1. Upgrade the installed packages to their latest versions with the command:
sudo apt upgrade

Step 3: Installing Node.js:

  1. Install Node.js on your Raspberry Pi by executing the following commands:
sudo apt install nodejs

Step 4: Installing Node-RED:

  1. With Node.js successfully installed, proceed to install Node-RED by running the following command:
sudo npm install -g --unsafe-perm node-red

Step 5: Launching Node-RED:

  1. Start Node-RED by entering the command:
node-red

Step 6: Accessing the Node-RED Editor:

  1. Open a web browser on your Raspberry Pi and navigate to http://localhost:1880.
  2. You will be greeted with the Node-RED editor interface.

Step 7: Exploring the Node-RED Editor:

  1. Spend some time familiarizing yourself with the Node-RED editor’s layout and functionality.
  2. On the left side, you will find a palette of nodes that can be used to build your flows.
  3. In the center, you can drag and drop nodes onto the canvas and connect them together to create flows.
  4. The right side contains additional information, debug panels, and configuration options.

Step 8: Building your First Flow:

  1. Start by dragging a node from the palette onto the canvas.
  2. Connect the output of one node to the input of another by clicking and dragging from one node’s output to another node’s input.
  3. Experiment with different nodes and connectors to create a simple flow.

Step 8: Building your First Flow (contd.):

  1. Click the “Deploy” button in the top-right corner of the Node-RED editor to activate your flow.

Step 9: Exploring Additional Nodes and Flows:

  1. Node-RED provides a vast library of additional nodes that can extend the functionality of your applications.
  2. Click on the “Manage Palette” option in the main menu to access the Node-RED library.
  3. Explore the available nodes, install the ones you need, and incorporate them into your flows.

Step 10: Automating Node-RED Startup (Optional):

  1. If you want Node-RED to start automatically when your Raspberry Pi boots up, you can use the systemd service manager.
  2. Execute the following commands to create a service for Node-RED:
sudo systemctl enable nodered.service
sudo systemctl start nodered.service

Conclusion: By following the step-by-step instructions in this article, you have successfully installed Node-RED on your Raspberry Pi. You are now equipped to explore the powerful features and capabilities of Node-RED’s visual programming environment. Use the Node-RED editor to create flows, connect nodes, and build interactive applications for your Raspberry Pi. Enjoy the creative possibilities that Node-RED offers and have fun experimenting with different nodes and flows!

Posted on 1 Comment

How to Install Google Cloud CLI on Linux

Introduction:

Google Cloud CLI (Command Line Interface) is a powerful tool that allows users to interact with Google Cloud Platform (GCP) using command-line commands. It simplifies the management of GCP resources and makes it easier to work with various GCP services. In this tutorial, we will guide you through the installation process of Google Cloud CLI on Linux.

Prerequisites:

  • A Linux machine (Ubuntu, Debian, CentOS, or any other Linux distribution)
  • An active Google Cloud Platform account (you can sign up for a free trial at https://cloud.google.com)

Step 1: Update your system

First, ensure your system is up-to-date by running the following commands:

sudo apt-get update
sudo apt-get upgrade

Step 2: Install prerequisites

Install the required packages for the Google Cloud CLI:

sudo apt-get install curl python3 python3-venv python3-pip

Step 3: Download the Google Cloud CLI installer

Download the installation script for Google Cloud CLI:

curl https://sdk.cloud.google.com | bash

Step 4: Restart your shell

After the installation script has finished running, restart your shell to enable the gcloud command:

exec -l $SHELL

Step 5: Initialize Google Cloud CLI

Now, initialize the Google Cloud CLI by running the following command:

gcloud init

This command will prompt you to log in to your Google account, choose a default project, and set a default region and zone. Follow the instructions provided to complete the initialization process.

Step 6: Verify your installation

To ensure that the Google Cloud CLI has been installed correctly, run the following command:

gcloud version

This command will display the version number of the installed CLI, which indicates that the installation was successful.

Conclusion:

Congratulations! You have successfully installed the Google Cloud CLI on your Linux machine. You can now use the gcloud command to manage your GCP resources and services. For more information on using Google Cloud CLI, refer to the official documentation: https://cloud.google.com/sdk/docs

Posted on Leave a comment

Providing AWS credentials to Terraform

When creating AWS infrastructure with Terraform, the AWS provider needs to be configured with the necessary credentials to authorize access to your Amazon Web Services account.

There are several ways to provide these credentials to Terraform:

  1. Environment variables:
    You can set the AWS_ACCESS_KEY_ID and AWS_SECRET_ACCESS_KEY environment variables with your AWS credentials. Terraform will automatically detect these variables when running any command. You can also set the AWS_SESSION_TOKEN environment variable if you’re using temporary security credentials.
export AWS_ACCESS_KEY_ID="your_access_key"
export AWS_SECRET_ACCESS_KEY="your_secret_key"
  1. Shared credentials file:
    The AWS CLI and SDKs use a shared credentials file, usually located at ~/.aws/credentials (Linux/macOS) or %UserProfile%\.aws\credentials (Windows). You can configure multiple named profiles with different AWS credentials in this file. By default, Terraform uses the “default” profile, but you can specify a different profile using the profile attribute in the AWS provider configuration block.

Example of a shared credentials file:

[default]
aws_access_key_id = your_access_key
aws_secret_access_key = your_secret_key

[custom-profile]

aws_access_key_id = your_other_access_key aws_secret_access_key = your_other_secret_key

  1. AWS provider configuration block:
    You can directly provide the access and secret keys in the AWS provider configuration block in your Terraform configuration files. However, this method is not recommended, as it may expose your credentials if the file is accidentally shared or committed to a version control system.
provider "aws" {
  access_key = "your_access_key"
  secret_key = "your_secret_key"
  region     = "us-west-2"
}

It’s generally recommended to use environment variables or a shared credentials file to provide AWS credentials to Terraform. This way, you can keep your credentials secure and separate from your Terraform configuration files.

Posted on Leave a comment

Verify an AWS VPC created with Terraform

To verify if the AWS VPC created with your Terraform configuration was successful, you can follow these steps:

  1. Check Terraform output: After running terraform apply, review the output for any errors or issues. If the VPC and associated resources were created successfully, you should see a message indicating that the resources were added.
  2. Check Terraform state: Run terraform show in your project directory to display the current state of your resources. This command will show the details of the created VPC and its related resources, such as subnets, Internet gateway, and route tables. Verify that the configuration matches your intended setup.
  3. Use AWS CLI: If you have the AWS CLI installed and configured, you can run the following command to list your VPCs:sqlCopy codeaws ec2 describe-vpcs Look for the VPC with the same CIDR block and name (tag) specified in your Terraform configuration. You can also use other AWS CLI commands to inspect the created subnets, route tables, and other VPC-related resources.
  4. Use AWS Management Console: Log in to your AWS Management Console, navigate to the VPC Dashboard, and check for the newly created VPC. Verify the CIDR block, name (tag), and related resources, such as subnets and Internet gateways, to ensure that the VPC was created as expected.
  5. By using a combination of these methods, you can confirm that the VPC created with your Terraform configuration was successful and matches your intended setup.
Posted on Leave a comment

Creating a VPC on AWS using Terraform.

Below is a simple example of a Terraform module for creating a VPC in AWS. The module is reusable and accepts input variables to customize the VPC configuration.

First, create a directory for your VPC module, e.g., modules/vpc.

In the modules/vpc directory, create a file named main.tf and add the following contents:

resource "aws_vpc" "this" {
  cidr_block = var.cidr_block
  tags = {
    Name = var.vpc_name
  }
}

resource "aws_subnet" "this" {
  count = length(var.subnet_cidr_blocks)

  cidr_block = var.subnet_cidr_blocks[count.index]
  vpc_id     = aws_vpc.this.id
  tags = {
    Name = "${var.vpc_name}-subnet-${count.index + 1}"
  }
}

resource "aws_internet_gateway" "this" {
  vpc_id = aws_vpc.this.id
  tags = {
    Name = "${var.vpc_name}-igw"
  }
}

resource "aws_route_table" "public" {
  vpc_id = aws_vpc.this.id
  tags = {
    Name = "${var.vpc_name}-public-rt"
  }
}

resource "aws_route" "public_internet_gateway" {
  route_table_id         = aws_route_table.public.id
  destination_cidr_block = "0.0.0.0/0"
  gateway_id             = aws_internet_gateway.this.id
}

resource "aws_route_table_association" "public" {
  count = length(var.subnet_cidr_blocks)

  subnet_id      = aws_subnet.this[count.index].id
  route_table_id = aws_route_table.public.id
}

Next, create a file named variables.tf in the same directory to define the input variables:

variable "cidr_block" {
  description = "The CIDR block for the VPC"
  type        = string
}

variable "vpc_name" {
  description = "The name of the VPC"
  type        = string
}

variable "subnet_cidr_blocks" {
  description = "The list of CIDR blocks for the subnets"
  type        = list(string)
}

Now, to use the VPC module in your main Terraform configuration, create a main.tf file at the root level and include the following contents:

module "vpc" {
  source = "./modules/vpc"

  cidr_block         = "10.0.0.0/16"
  vpc_name           = "my-vpc"
  subnet_cidr_blocks = ["10.0.1.0/24", "10.0.2.0/24", "10.0.3.0/24"]
}

This configuration sets up a VPC with a /16 CIDR block, an Internet gateway, a public route table, and three /24 subnets. The module is reusable and can be customized using input variables.

Please note that this is just a simple example, and a production-ready VPC module may include additional resources such as network ACLs, security groups, and NAT gateways.

Posted on Leave a comment

How to Install Terraform on Linux

Introduction

Terraform is a popular Infrastructure as Code (IaC) tool that allows you to manage and provision your infrastructure through simple, declarative configuration files. It supports various cloud providers and platforms, making it a go-to tool for DevOps engineers and developers alike. In this tutorial, we will guide you through the process of installing Terraform on a Linux system.

Prerequisites

  • A Linux-based operating system (We will use Ubuntu 20.04 for this tutorial)
  • Basic knowledge of Linux terminal commands
  • Access to the terminal with root or sudo privileges

Step 1: Update Your System

Before installing any new software, it is always a good practice to update your system to ensure that you have the latest security patches and dependencies. To update your Linux system, run the following commands:

sudo apt update
sudo apt upgrade

Step 2: Download Terraform Binary

Terraform is distributed as a single binary file. To download the latest version of Terraform, visit the official Terraform download page (https://www.terraform.io/downloads.html) and select the appropriate package for your Linux distribution. Alternatively, you can use the wget or curl command to download the binary directly from the terminal.

For example, to download Terraform version 1.2.0 for 64-bit Linux, run the following command:

wget https://releases.hashicorp.com/terraform/1.4.6/terraform_1.4.6_linux_amd64.zip

Step 3: Extract the Terraform Binary

Terraform is distributed as a zip archive. After downloading the file, use the unzip command to extract the Terraform binary. If you don’t have the unzip utility installed, you can install it with the following command:

sudo apt install unzip

Now, extract the Terraform binary:

unzip terraform_1.4.6_linux_amd64.zip

Step 4: Move the Terraform Binary to a System Path

To make Terraform accessible from anywhere in your system, move the binary file to one of the directories listed in your system’s PATH variable. A common location for this is /usr/local/bin. Move the Terraform binary with the following command:

sudo mv terraform /usr/local/bin/

Step 5: Verify the Installation

To verify that Terraform has been installed successfully, run the following command:

terraform --version

If the installation was successful, you should see the version number of the installed Terraform binary:

Terraform v1.4.6

Conclusion

You have now successfully installed Terraform on your Linux system. With Terraform installed, you can start creating and managing your infrastructure using simple configuration files. To learn more about Terraform and how to use it effectively, visit the official Terraform documentation (https://www.terraform.io/docs/index.html).